Tuesday, February 9, 2021

Technique Tuesday Blog Hop (Feb, 2021)


Thank you for joining us to share different Die Cutting Techniques. I really love all the Stampion' Up! dies because they are so detailed.  It's amazing how the use of dies can add a huge wow to the simpliest card.  When I first started I had a lot of trouble getting the dies to cut the cardstock and to punch out all the little pieces out of the die. My other challenge was to try to put glue on the back of any detailed die to attach it to the card.  If either of these challenges sound familar to you, I have some two suggestions: wax paper and adhesive sheets!

Let me share how to use wax paper and adhesive sheets to improve your die cutting experiences. I was making a number of card kits using the Many Layered Blossoms Dies for an upcoming virtual card class. I love the Many Layered Blossoms Dies as they are incredibly detailed and you can use any color combination to make an amazing card. 

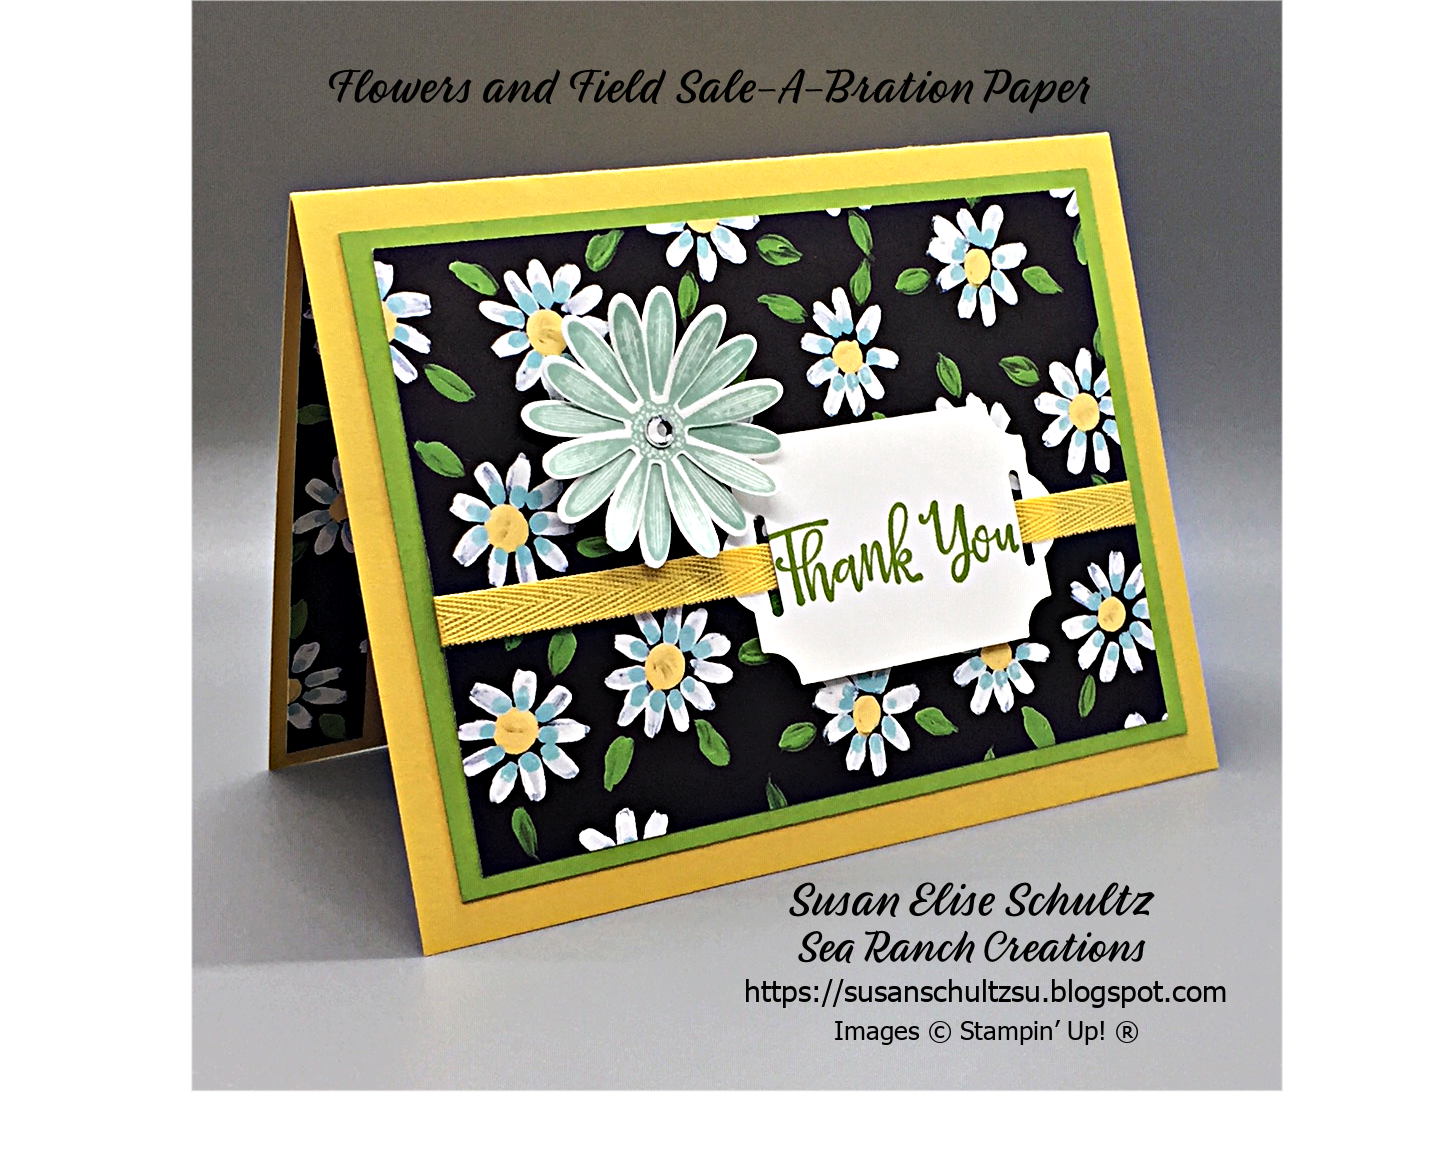
Here's one of the cards:

In the past I've tried many different techniques that didn't work, but I've had lots of success using wax paper. I've found the best way to get a good clean cut with the dies is to rub the cutting side of every part of the die with waxed paper before I place it on the cardstock. The wax on the edges of the die helps to cut the paper. If I'm making many cuts with the same die, I rub it with wax paper before each cut. To attach the flower bouquet for this card, I used adhesive sheets. 

These are so simple to use, so just give it a try. 

  • Cut the adhesive sheet and cardstock a little larger than the die you intend to use.
  • You peel off one side of the adhesive sheet
  • Place the peeled side of the adhesive sheet onto the cardstock or designer series paper that you wish to cut
  • Rub the cut edge of the die with wax paper 
  • Arrange the die on top of the cardstock with the adhesive sheet attached to the bottom
  • Put the die, cardstock, and cutting plates through your Stampin' Cut and Emboss Machine and remove the die cut with adhesive sheet on the back of the cardstock


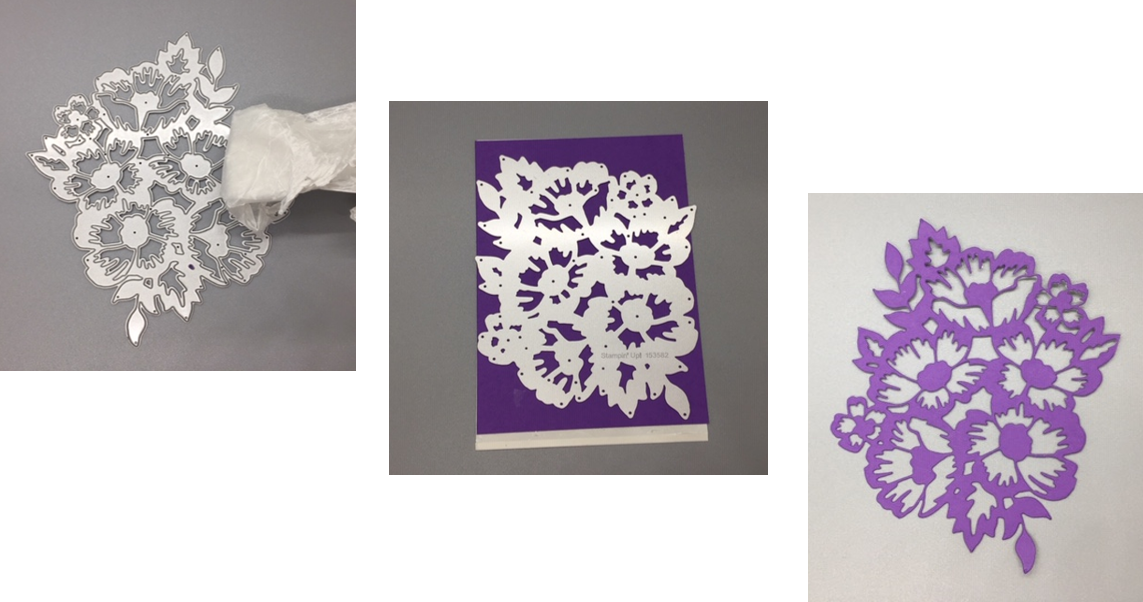
  • Attach the die to your card by gently peeling back the other piece of paper  on the back side of the die that will expose the adhesive material to a portion of the card front.
  • Gentle pull back the adhesive while making sure the die is attaching to the card until the whole die is on the card front.
I hope my tips for die cutting and attaching die cuts to your cards were helpful.

Remember for any $50 or more purchase you make before February 28th, you will earn a Sale-A-Bration reward.  If you'd like to make a $50 or more purchase, please click here to shop at my on-line store.  Use my host code 7N7AGJJG and I will mail you a Thank You card and email you the Dandy Garden MEGA Tutorial Bundle as my gifts to you. 

Please check out the valuable tips from other demonstrators on this blog hop.

Monday, February 8, 2021

Monthly Blog Hop (February, 2021)


                                 Welcome to Our February Blog Hop

               Dragonfly Garden Bundle Accordian Fold Card


Thank you for joining us for our Stampin' Up!® Demonstrator Training Program Monthly Blog Hop! We are so happy that you could visit us today for this blog hop for ideas and creative inspiration. We are a group of Stampin' Up!® Demonstrators from around the world that are taking part in a monthly blog hop.

It's Sale-A-Bration Time at Stampin' Up! with lots of wonderful FREE products you can earn with a $50 or $100 purchase!  

I'm excited to share an accordian fold card made with the Dragonfly Garden Bundle.  I originally learned how to make this type of card from Diane Evans who uses 12 x 12 cardstock to make her beautiful cards.  I didn't have any 12 x 12 cardstock so I changed the dimensions to make this with 8.5" x 11.0" cardstock.  It's really quite simple.

                                                        
Once you take the band off the card, it opens up to provide lots of space for writing messages. It's the perfect style card for a group of people to send to someone for a birthday, thank you, or any occassion.

 Anyone who places a $50 or more order with me this month will receive:
  •  My Thank You card
  • The Dragonfly Garden Accordian Fold Card Tutorial for making this card
  • The Dandy Garden MEGA Tutorial Bundle including 62 card designs from demonstrators from across the world (see below)
  • Stampin' Up Sale-A-Bration reward.

Please order the Dragonfly Bundle, designer series paper, other embellishments or other Stampin' Up! products here on my on-line store and use the Host Code 7N7AGJJG.

Thanks so much for stopping by today! This is a blog hop so make sure you 'hop' around to all the amazing projects on this hop! Click on the links below to visit them.

Blog Hop


Dandy Garden MEGA Tutorial Bundle - Free with $50 purchase from my on-line store.


Monday, February 1, 2021

Explore the Blossoms in Bloom Bundle

Come explore the Blossoms in Bloom Stamp Set and the Many Layered Blossoms Dies. I enjoy using this bundle because it inspires me to create cards with beautiful blossoms for any occasion at any time of year. Even better - You’ll receive a 10% discount when you buy the bundle and also earn a reward from the Sale-A-Bration Booklet!  If you'd like to purchase this bundle, click here.


My favorite thing about the Blossoms in Bloom Bundle is the simple watercolor effect. Painting with standard watercolors can be tricky, but with the Blossoms in Bloom Bundle, achieving the artistic look of watercolor is a breeze! 


Although the watercolor effect is my go-to, you can create a variety of different looks using the Many Layered Dies. If you’d like to discover what else you can do with the Blossoms in Bloom Bundle, let me know! I’d love to see what you’d create with this set


I'll be featuring this Blossoms in Bloom Bundle on one of the cards in my February 9th Virtual Card Class. This month we will make 4 beautiful cards with different sentiments for Happy Birthday, Get Well, Thinking of You, and Thank You. I mail you the card kits, tutorials, and zoom information for the class. The cost of the class is $25 which includes shipping. Deadline for participating is February 3rd so I can mail the materials to you. Sign up for the class here

Remember you’ll receive a 10% discount when you buy the bundle and also earn a reward from the Sale-A-Bration Booklet!  You will also receive a FREE Creativity Abounds Tutorial Bundle featuring 13 card designs using the Dandy Garden suite.  If you'd like to purchase this bundle, click here.

Wednesday, January 20, 2021

Creativity Abounds Blog Hop - January 2021

Welcome to our first Creativity Abounds Blog Hop! 

We are a group of talented Stampin’ Up!® Demonstrators from around the world that are coming together to share our creative ideas with you. We are happy that you can join us and hope that we can inspire you to make creations of your own.


Wow, I'm so excited to be participating in the Creativity Abounds Design Team with this amazing group of Stampin' Up! demonstrators. Here's a picture of all the members of the team and where they live. I know you're going to love to their cards and projects.


This month's theme is a Love Theme just in time for you to create a card or special gift for someone special in your life (spouse, significant other, family member, and  best friend) for Valentine's Day on February 14th. 

To design the gift box which includes 4 gift cards with envelopes, I selected the Always In My Heart stamp set and the beautiful  True Love designer series paper on pgs 11 and 12 of the new Stampin' Up! January-June Mini Catalog.  

I love how easy it is to make this box and to design the four beautiful gift cards. 


To make the box bottom:
  • Select a color of cardstock for your box. For my project, I selected Melon Mambo cardstock.
  • Cut the  cardstock at 8.5" x 8.5" or 21.6 cm x 21.6 cm.
  • Score the cardstock on all four sides at 2.5" or 6.4 cm
  • Cut the scored area up to the first score line on all four corners.
  • Attach the corner flaps using your favorite adhesive to form the bottom of the box.
  • Cut four pieces of designer series paper (each 2.25" x 3.25"or 5.7 cm x 8.3 cm) to decorate the four sides of the box using your favorite adhesive. I used True Love designer series paper.


To make the top of the box
  • Select a color of cardstock for the top of your box. I used the Melon Mambo cardstock.
  • Cut the  cardstock at 4.5" x 4.5" or 11.4 cm x 11.4 cm.
  • Score the cardstock on all four sides at 1.0" or 2.5 cm
  • Cut the scored area up to the first score line on all four corners.
  • Attach the corner flaps using your favorite adhesive to make the top of the box.
  • Add a 4.0" x 4.0" or 10.0 cm x 10.0 cm pieces of designer series paper to the top of the lid. I used True Love designer series paper.
  • Add die cuts or stamp images and embellish the front of your gift cards. I fussy cut out the image of a double flower and colored it in with Melon Mambo blends and Old Olive blends.
  • Add a sentiment and embellishments. I added the sentiment using the Always In My Heart stamp sets. I used the the Label Me Fancy punch, and I colored pearls with Melon Mambo blends to be used as embellishments. I also added Wink of Stella Glitter to each flower.


To make the 4 gift cards

If you would like to make this box and gift cards and you live in the USA, I would appreciate it if you purchase products from my on-line store. You can select  any of the highlighted blue items to purchase or go to SHOP NOW at the top of my blog. If you purchase $50 or more, you will receive a handmade Thank You card and the Creativity Abounds Love Themed Tutorial Bundle as a free gift. If you are a demonstrator or not interested in buying products, you can purchase the Love Themed Tutorial for $15 just email me. Here is a sneak peek:

You may be starting here or have come from someone else's blog - see the list below to help you move around all the different blogs and get many amazing ideas. We all have our country listed - so if you are looking for a demonstrator in your country, these demonstrators would love to look after you with your Stampin' Up!® shopping or if you would like to join our Stampin' Up!® teams.


Blog Hop List

Friday, January 15, 2021

Always In My Heart Bundle Card Class

Join the Always In My Heart Card Class

Sign Up for the Always In My Heart Card Class conducted on zoom on January 26, 2021 from 6 to 8pm.  This brand new bundle (stamp set and dies) is featured in the New Stampin' Up January to June Mini Catalog on page 12. 

This Valentine's Day cards will be one of the cards we make during the class. The detailed heart made out of foil is attached to the left-hand flap while the sentiment stamped on the interior heart is attached to the right-hand flap. The two pieces interlock when you close the card. Come join the class to learn this technique. I will mail you all the materials you will need to make the cards. You will need stamps, ink, and adhesives to comlete the cards.

The Bundle can also be used for Special Friends, Anniversaries, and Weddings. There are so many different ways to use this beautiful stamp set.  This is another card we will create in the class that can be given to a special friend or significant other. Is the card made with colored designer series paper or was it colored  using colored pencils? Come to the class to learn some coloring techniques.


Cost: $25 for 4 cards which includes Card Kits, Tutorials, and Shipping.

Payment on PayPal or Venmo.

Deadline for signing up is Sunday, Jan 17th so I can prepare card kits to mail to you. 

Tutorials Only: $15 and I will email pdf after payment.

Please click here if you want to participate in this class. 


Monday, January 11, 2021

Monthly Blog Hop (January 2021)

 Welcome to Our January Blog Hop


Thank you for joining us for our Stampin' Up!® Demonstrator Training Program Monthly Blog Hop! We are so happy that you could visit us today for this blog hop for ideas and creative inspiration. We are a group of Stampin' Up!® Demonstrators from around the world that are taking part in a monthly blog hop.

It's Sale-A-Bration Time at Stampin' Up! with lots of wonderful FREE products you can earn with a $50 or $100 purchase!  

Todays cards feature a beautiful designer series paper pack called Flower and Field. Each 12 x 12 double sided paper is full of vibrant colors and beautiful designs.  You will definitely want to select this as one of your Sale-A-Bration rewards.


Thank you to all my customers who already placed orders with me this month! I truly appreciate your support. Everyone who places an order this month will receive one of these festive Thank You cards. 

I used the Label Me Fancy punch to make a slit on each side of the Whisper White Cardstock punched with the Everyday Label punch. This allowed me to thread the ribbon through the sentiment.  I really like this effect! What do you think? 

The first card was made with Pool Party, Flirty Flamingo, and Whisper White Cardstock, Flower and Field Paper, Pool Party ribbon, Flirty Flamingo and Bumblebee Ink, Rhinestone, Everyday Label Punch, Label Me Fancy Punch, and Medium Daisy Punch.


The second card was created using Bumblebee, Granny Apple Green, and Whisper White Cardstock, a different piece of Flower and Field Paper, Bumblebee ribbon, Granny Apple Green and Pool Party ink, and the three different punches listed above.


If you purchase the three punches - Everyday Label (144668, $18), Label Me Fancy (151297, $18), and the Medium Daisy (149517, $16) for a total of $52, you could select the Flower and Field Designer Series Paper for FREE. I'd be honored if you did your shopping on my on-line store (select SHOP NOW on the top menu bar)

Thanks so much for stopping by today! This is a blog hop so make sure you 'hop' around to all the amazing projects on this hop! Click on the links below to visit them.

Blog Hop List

Sunday, January 3, 2021

Join My 2021 January-June Mini Catalog Launch Party!

Join me for the 2021 January-June Mini Catalog Launch Party on Tuesday, January 5th from 6 to 7pm PST on zoom (https://us02web.zoom.us/j/6299191902 passcode 123). 

We will have a live scavenger hunt through the catalog and I'll be giving out some SALE-A-BRATION prizes to the winners! 

I know you are going to LOVE the products offered in the new catalog and the collection of FREE SALE-A-BRATION items that you can earn by placing either a $50 or $100 order.

If you're one of my customers you should receive your catalog in the mail no later than Monday and be ready for the Launch Party. If you are not one of my customers, you can CLICK on the picture of the new catalog on the right menu bar and download the pdf. 

If you do not already have a wonderful Stampin' Up! demonstrator and you live in the USA, let me know if you want me to mail you a catalog!

Please email me at ses@aquarius.family if you have any questions.

Hope you can join the Launch Party!

Susan

Saturday, January 2, 2021

Stamping/Crafting Goals For 2021


A Few of My Goals for 2021

    * Share My Love of Card Making with Others

    * Brighten Someone's Day with a Beautiful Card

    * Keep My Crafting Space Organized

    * Be More Consistent Posting on My Blog

Please share your stamping and/or crafting goals in the comments below. Somehow writing them down helps to make them REAL and ATTAINABLE.