Sunday, July 25, 2021

Share It Sunday Blog Hop - July 2021


The Crafty Collaborations team is comprised of Stampin’ Up! Demonstrators from around the world. Each month, we participate in several collaborative projects including blog hops, like this one, to inspire all of us in our passion for crafting. Our goal is to create, share, and inspire others to keep our creative energy flowing.

Every year we send out more than 100 Holiday cards to family and friends. Each card is made with love and with the hopes that it will bring a smile to a special person's face. So this is the month for me to start planning my Holiday cards for the year. As a Stampin' Up Demonstrator, I'm able to pre-order amazing products from the July-December Mini Catalog before it is available to the public on August 3rd.

Do you want to start making your Holiday cards?  I'll be hosting a Virtual Holiday Card Retreat for the next 5 months. Each month, you purchase the suite or a specific bundle plus other products from my on-line store. I mail you kits for cards and 3-D projects to be used during the Holidays. You'll also receive the tutorials (pdf or videos) and we'll have a crafting day to make our cards and projects via zoom.

August 14                Tidings & Trimmings Bundle (plus)          $64.00

September 17/18    Whimsy & Wonder Suite                             $80.25  

This will be a Stamping Retreat with the Creativity Abounds Design Team. We'll be producing 13 Tutorials with videos plus 13 bonus items.

If you have a special request for a suite or bundle, please let me know as I'm still making decisions for Oct, Nov, and Dec.

This week I've been designing and creating cards using the Tidings and Trimmings Bundle in preparation for my Virtual Holiday Retreat on August 14th. I decided to make a Festive Starburst card using the Tidings and Trimmings Designer Series paper scraps from the week.


I had fun making mini triangles out of the scraps to place on the inside of the card. 


Thank you so much for visiting my blog - Sea Ranch Creations today! Please check out all the other demonstrator's card designs - I know you're going to love them.

Happy Stamping!
Susan


Saturday, July 24, 2021

Paper Pumpkin Blog Hop - July 2021


The July 2021 Paper Pumpkin kit is focused around Adventure! Our family owned a simple pop up camper that was tenting on the top and metal frame on the bottom that was hitched to the car. We had many wonderful adventures as a family in that small camper. I have many happy memories of those camping experiences.

The three cards in the kit are fun folds and include beautiful images of mountains and being with nature.  I only modified the kit card design slightly by cutting out the trailer and attaching it to a different card front. Then I added "The World Awaits You" sentiment stamped in Garden Green. I added a rhinestone for the door nob of the trailer and around the sentiment. It was an easy way to make an beautiful card using elements from the kit.


Thank you so much for visiting my blog - Sea Ranch Creations. Please take some time and 'hop' around to get inspiration from other demonstrators for using the July 2021 Paper Pumpkin kit. 

Happy Stamping!

Susan


Blog Hop


Thursday, July 22, 2021

Ink and Inspiration Blog Hop - Make It Sparkle (July 2021)


This group is made up of Stampin' Up Demonstrators from around the world and our goal is to inspire folks to share their special talents to make and send cards to family and friends.

This month our theme is Make It Sparkle. When I saw the theme I immediately thought of lots of specialty paper with foil highlights, delicate dies, and shinny ribbon. Using this criteria, I selected the Elegantly Said Bundle, Simply Elegant Specialty Designer Series paper, Gold Fine Art Ribbon, and making intricate gold and silver foil die cuts using the Encircled in Beauty Dies. I decided to use Basic Black cardstock as the card base so the foil and ribbon can sparkle.


To make this card:
  • Cut a 4.25" x 11.0" piece of Basic Black cardstock and score at 5.5". Use a bone folder to make a crisp fold on the score line.
  • Cut four pieces of Simply Elegant Specialty Designer Series papers (one piece at 3.75" x 3.75" two pieces at 0.75" x 3.75", and a strip for inside the card 0.75" x 5.25"). 
  • Use the largest die from the Encircled in Beauty Dies and the Stampin' Cut and Emboss Machine to cut the shape out of Gold Foil. Then place the the ornate die inside the Gold Foil outline and run it through the Stampin' Cut and Emboss Machine again.
  • Cut a circle from Silver Foil using the Layering Circles Dies and the Stampin' Cut and Emboss Machine to cut out a Silver Foil circle.
  • Stamp the "All The Things You Do Are Simply Amazing" sentiment from the Elegantly Said Stamp set onto Very Vanilla cardstock using Basic Black ink.
  • Use the small scalloped circle from the Layering Circles Dies and the Stampin' Cut and Emboss Machine to cut out the sentiment.
  • Attach the scalloped sentiment to the Silver Foil using dimensionals.
  • Attach the ribbon to the top of the back side of the largest piece of Simply Elegant Specialty Designer Series paper with Gold Foil highlights, over the second piece of paper, and attach to the back side of the top piece of paper.
  • Secure the pieces of Simply Elegant Specialty Designer Series paper to the Basic Black cardstock on the card base using your favorite adhesive.
  • Tie a bow out of the Gold Fine Art Ribbon and attach to the card front using glue dots.
  • Attach the 0.75" x 5.25" piece of Simply Elegant Specialty Designer Series paper to the Very Vanilla cardstock using your favorite adhesive.
  • Attach a 4.0" x 5.25" piece of Very Vanilla cardstock to the inside of the card using your favorite adhesive.

Thank you so much for visiting my blog - Sea Ranch Creations today! Do take time to look at the other demonstrator's card designs. We hope you'll get inspiration to help you make cards.

Happy Stamping!
Susan

Blog Hop


Have You Started Your Holiday Cards?  Every year, I make approximately 100 Holiday Cards to mail to family and friends. Since I put a lot of love into each card I have to get an early start. 

Each month, I'll be offering a full day Holiday Retreat which will include Holiday Gift Ideas, Holiday Card Tutorials, and Make-n-Takes when you purchase the Suite or Bundle with additional supplies. Here is the information for August and September. I'm still planning for October, November, and December so if you have a favorite Holiday Suite let me know. Just email me at ses@aquarius.family to RSVP for the events.

August 14, 2021              Tidings and Trimmings Bundle plus           $63.00

This Holiday Retreat will include 6 Tutorials with Videos, Make-n-Takes, and lots of Bonus projects.

September 18, 2021       Whimsy and Wonder Suite Stamp Camp   $80.25

This Stamp Camp will be with the Creativity Abounds Design Team and will include 13 Tutorials with videos, Make-n-Takes and lots of Bonus cards/projects.

During August and September you'll also receive a Stampin' Up Sale-A-Bration reward when you purchase the Holiday Retreat supplies.  You'll also receive a Thank You card and the latest Creativity Abounds Design Team Tutorial Bundle which features the Elegantly Said Bundle. This is a truly stunning collection of cards that you won' t want to miss! 


Wednesday, July 21, 2021

Creativity Abounds Design Team Blog Hop - July 2021


Please welcome our new Design Team members Heather Thomas from the UK and Maheswari Rajaguru from Australia. I know you're going to love their designs!


This month we're showcasing the amazing Elegantly Said Bundle with beautiful sentiments and images as well as a new punch. The incredible Simply Elegant Specialty Designer Series paper is beautiful and many of the papers have copper or gold foil highlights. 


To make my card:

  • Cut a 4.25" x 11.0" piece of Basic Black cardstock and score at 5.5". Use a bone folder to make a crisp fold on the score line. Cut the front card base 1.0" from the score line. Then cut another 1.0" strip to be used at the bottom of the card front.
  • Cut out two 0.75" x 4.0" pieces of Gold Foil.
  • Attach the two Gold Foil pieces to the top and bottom Basic Black pieces using your favorite adhesive.
  • Use the second largest rectangle die from the Scalloped Contour Dies and the Stampin' Cut and Emboss Machine to cut out a rectangle using a piece of Simply Elegant Specialty Designer Series paper.
  • Attach the top and bottom of the scalloped rectangle piece to the top edge and bottom top of the card front using your favorite adhesive.
  • Stamp the flower image from the Elegantly Said Stamp set onto a 2.0" x 2.0" piece of Very Vanilla cardstock using Basic Black ink.
  • Cut out a 2.25" x 2.25" piece of Gold Foil.
  • Attach the stamped image on the Very Vanilla cardstock to the Gold Foil using your favorite adhesive.
  • Stamp the "Happy Anniversary" sentiment from the Elegantly Said Stamp set onto a strip of Very Vanilla cardstock using Basic Black ink.
  • Attach the Gold Foil and sentiment to the center piece of the card front using dimensionals.
  • Cut a 4.0" x 5.25" piece of Very Vanilla cardstock for the inside of the card.
  • Stamp both edges with the long border stamp from the Elegantly Said Stamp set using Basic Black ink.
  • Attach the stamped Very Vanilla cardstock to the inside of the card using your favorite adhesive.
  • Add Matt Black Dots to the center of the two flowers on the card front.


Thank you so much for visiting my blog - Sea Ranch Creations today! Please be sure to 'hop' to the other demonstrator's links so you can see all of their amazing designs. We hope they will provide you with inspiration for your card making.

Happy Stamping!

Susan


Have You Started Your Holiday Cards? 

Every year, I make approximately 100 Holiday Cards to mail to family and friends. Since I put a lot of love into each card I have to get an early start. 

Each month, I'll be offering a full day Holiday Retreat which will include Holiday Gift Ideas, Holiday Card Tutorials, and Make-n-Takes when you purchase the Suite or Bundle with additional supplies. Here is the information for August and September. I'm still planning for October, November, and December so if you have a favorite Holiday Suite let me know. Just email me at ses@aquarius.family to RSVP for the events.

August 14, 2021              Tidings and Trimmings Bundle plus           $63.00

This Holiday Retreat will include 6 Tutorials with Videos, Make-n-Takes, and lots of Bonus projects.

September 18, 2021       Whimsy and Wonder Suite Stamp Camp   $80.25

This Stamp Camp will be with the Creativity Abounds Design Team and will include 13 Tutorials with videos, Make-n-Takes and lots of Bonus cards/projects.

During August and September you'll also receive a Stampin' Up Sale-A-Bration reward when you purchase the Holiday Retreat supplies.  You'll also receive a Thank You card and the latest Creativity Abounds Design Team Tutorial Bundle which features the Elegantly Said Bundle. This is a truly stunning collection of cards that you won' t want to miss! 


Crafty Challenge Blog Hop - Color (July 2021)


Welcome to the July Crafty Challenge Blog Hop. We're a group of Stampin' Up Demonstrators from around the world that participate in this blog hop to inspire and encourage card makers to create new cards.  This month our challenge is to use Granny Apple Green, Bermuda Bay, and Melon Mambo when designing our cards. 


I really like color challenges as you can use any stamp set or bundle as long as you incorporate the selected colors into your design. I've been designing a card class with the Seascape Bundle  I'm offering on July 27th.  It's too late to receive the card kits but you can still purchase the pdf tutorials for all of the measurements by emailing me at ses@aquarius.family.

It was so easy to incorporate these colors into a card using the Seascape Bundle. Bermuda Bay cardstock was used for the card base and die cutting the two little fish. Using the Bark Embossing Folder, I simulated the look of water on a piece of Granny Apple Green cardstock. The coral die cut was made from Melon Mambo cardstock. I had a fun time coloring the large fish by first adding Melon Mambo to the body and blending Bermuda Bay on the fins using ink and a sponge dauber. 


I hope you've gotten some inspiration from my card today. I can't wait to see the card designs by the other demonstrators in this blog hop. Please check out all of their amazing creations and challenge yourself to make some cards with this beautiful card combination.

Happy Stamping!
Susan


Have You Started Your Holiday Cards? Every year, I make approximately 100 Holiday Cards to mail to family and friends. Since I put a lot of love into each card I have to get an early start. 

Each month, I'll be offering a full day Holiday Retreat which will include Holiday Gift Ideas, Holiday Card Tutorials, and Make-n-Takes when you purchase the Suite or Bundle with additional supplies. Here is the information for August and September. I'm still planning for October, November, and December so if you have a favorite Holiday Suite let me know. Just email me at ses@aquarius.family to RSVP for the events.

August 14, 2021              Tidings and Trimmings Bundle plus           $63.00
This Holiday Retreat will include 6 Tutorials with Videos, Make-n-Takes, and lots of Bonus projects.

September 18, 2021       Whimsy and Wonder Suite Stamp Camp   $80.25
This Stamp Camp will be with the Creativity Abounds Design Team and will include 13 Tutorials with videos, Make-n-Takes and lots of Bonus cards/projects.


During August and September you'll also receive a Stampin' Up Sale-A-Bration reward when you purchase the Holiday Retreat supplies.  You'll also receive a Thank You card and the latest Creativity Abounds Design Team Tutorial Bundle which features the Elegantly Said Bundle. This is a truly stunning collection of cards that you won' t want to miss!


Saturday, July 17, 2021

Casually Crafting Design Team Blog Hop - July 2021


The Casually Crafting Design Team is a group of Stampin’ Up! demonstrators from around the world, gathered together to share our passion for creativity with you. Our focus is to bring you inspiration featuring projects that are easy to create while still packing a powerful creative punch. The projects are made with a few products, making them ideally suited to a beginner or casual crafter. From time-to-time, we may also include a project that is stepped-up for the added wow-factor.

This month our team will be creating cards inspired by this Sketch Challenge. As you're looking at each card, see how the designer used the sketch to create their card. 


I've used the Elegantly Said Bundle and Simply Elegant Specialty Designer Series paper to make my card. I really like how the Basic Black cardstock, Gold Foil, Very Vanilla cardstock, and designer series paper complement one another.


To make the card:

  • Cut a 5.5" x 8.5" piece of Basic Black cardstock and score it at 4.25". Use the bone folder to make a crisp fold at the score line. Cut 1" on the right-hand side of the card front.
  • Cut a 3.0" x 3.25" piece of Simply Elegant Specialty Designer Series paper and three strips of 0.5" x 3.0".
  • Attach the Simply Elegant Specialty Designer Series paper with equal spaces between the pieces using your favorite adhesive
  • Stamp the "Thank You" sentiment from the Elegantly Said Stamp set onto a piece of Very Vanilla cardstock using Basic Black ink.
  • Attach it to the lower right-hand corner of the large piece of Simply Elegant Specialty Designer Series paper using your favorite adhesive.
  • Stamp the flower image from the Elegantly Said Stamp set onto a 2.0" x 2.0" piece of Very Vanilla cardstock using Basic Black ink.
  • Cut a 2.25" x2.25" of Gold Foil paper.
  • Attach the stamped flower image Very Vanilla cardstock to the Gold Foil and attach the larger piece of Simply Elegant Specialty Designer Series paper using dimensionals.
  • Stamp the border image from the Elegantly Said Stamp set onto the Very Vanilla cardstock using Basic Black ink
  • Attach the Very Vanilla cardstock to the inside of the card using your favorite adhesive.
  • Add three Matte Black Dots to the card front.


Thank you so much for visiting my blog - Sea Ranch Creations. Please take some time and "hop" to see the amazing cards designed by other members of our team. I know they will inspire you with their creativity.


Happy Stamping!

Susan


Monday, July 12, 2021

Monthly Blog Hop - July 2021


Welcome to our July Blog Hop! We're a group of Stampin' Up Demonstrators from around the world who design cards to inspire and each month we design Thank You cards for our valuable customers and team members. 

We've had beautiful weather on the northern coast of California and with the recent low tides I spent some time exploring the tidepools. During my visit, it was like looking through an aquarium window and I was able to see various seaweeds, sea anemones, starfish, blue mussels, and small fishes. I took inspiration from my tidepool visit and the amazing Seascape Bundle to create this card. 


My color combination includes Pacific Point, Basic Black, Calypso Coral, Daffodil Delight, and Basic White.  I used a piece of Expressions In Ink Designer Series paper for the background and highlighted the eyes with rhinestones. 


I especially like how the coral die makes multiple cuts which enables you to pull parts forward to make them look like coral polyps filtering the water for food. Likewise, the seahorse dies are flexible and allow you to wrap the tail around a branch of coral which replicates nature perfectly.


Sign up for my newsletter and you'll get a pdf tutorial for making this card.

If you place an order with me in July, I'll be sending you one of these Thank You cards.  If you place a $50 or more order and use my July Host Code, CZYMRU4T, you'll also receive a Creativity Abounds Hand-Penned Tutorial Bundle or you can purchase it for $15 by emailing me at ses@aquarius.family


Thank you so much for visiting my blog -Sea Ranch Creations today! Please make sure you take time to visit all the other amazing cards created for you on this blog hop.

Happy Stamping!
Susan

Blog Hop

Thursday, July 8, 2021

Stampin' Dreams Blog Hop - Christmas (July 2021)


This month we're making cards with a Holiday theme! We're hoping our cards will inspire you to start thinking about the cards you want to send out for the Holidays.

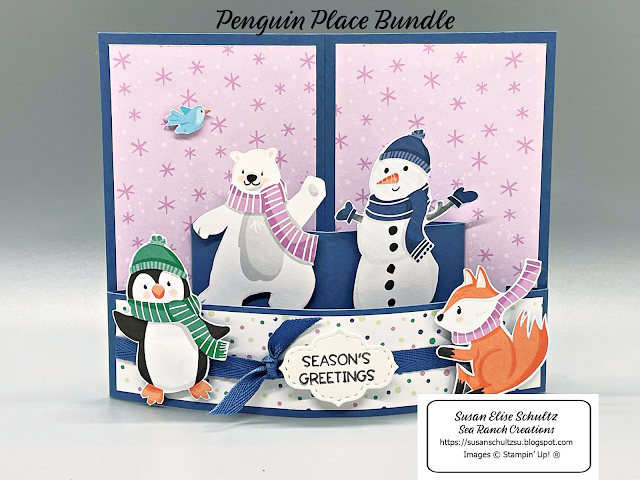
I've fallen in love with the Penguin Place Bundle from the new July-December Mini Catalog and the Penguin Playmates 12 x 12 Designer Series paper you can earn with a $50 purchase using Sale-A-Bration rewards. 

I learned how to make a Curvy Pop Up Card watching a video by Lisa Curcio. I made a Holiday version of this fun fold design. It's much easier than it looks. I used Misty Moonlight for the card base, I fancy cut the images of the penguin, polar bear, snowman, fox, and bird out of the Penguin Playmates Designer Series paper. 


To make this card,

  • Card Base: 
    • Cut out a piece of 4.25" x 5.5" piece of Misty Moonlight cardstock and score it at 2.75". Use your bone folder on the score line to make a crisp fold.
    • Cut out two 4.0" x 2.5" piece of Penguin Playmates Designer Series paper and attach them to the card base using your favorite adhesive.
    • Attach the bird on the top left-hand side of the card base using dimensionals.

  • Middle Layer: 
    • Cut out a piece of 2.0" x 4.5" piece of Misty Moonlight cardstock and score it at 0.5", 2.25", and 4.0".
    • Attach the snowman and the polar bear to the two panels using dimensionals.
    • Line up the center of this layer with the center of the card base at the bottom and attach the tabs on each end using your favorite adhesive (see photo below).
  • Front Layer: 
    • Cut out a 1.25" x 6.5" piece of Misty Moonlight cardstock and score it at 0.5" on each end.
    • Cut out a 1.0" x 5.25" piece of Penguin Playmates Designer Series paper
    • Attach a strip of Misty Moonlight Ribbon to the center of the Penguin Playmates Designer Series paper and secure in the back. Tie a small knot onto the Misty Moonlight Ribbon.
    • Attach the front layer to the bottom of the card base at the tabs on each end using your favorite adhesive (see photo below).
    • Attach the Penguin and Fox to the front layer using dimensionals.


Now you may be wondering how to mail this card...just flatten the middle and front layers and the card will side perfectly into a regular A2 envelope. 

Thank you so much for visiting my blog - Sea Ranch Creations! Please take time to look at all the other amazing Holiday cards designed by other demonstrators. I know you will find some incredible card designs.

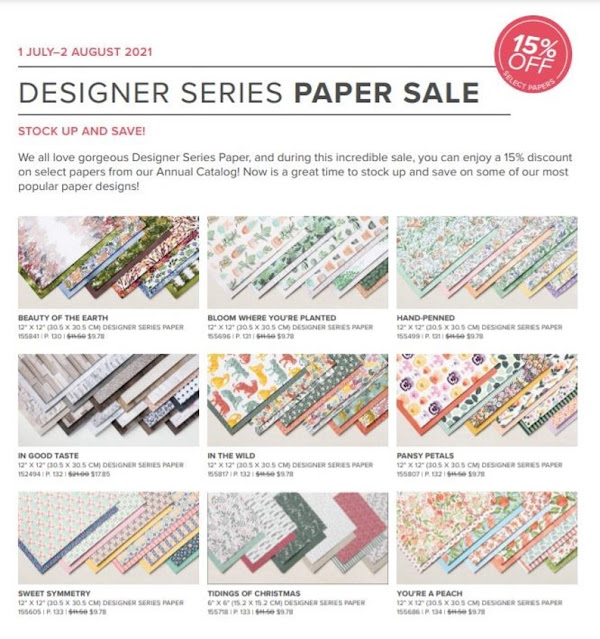
Stampin' Up is currently having a 15% off SALE on selected Designer Series papers. This would be a great time to stock up on some of your favorite papers! I just love the Hand-Penned paper so that will definitely be on my shopping list. I also want to start my Holiday cards so this is the perfect time to buy some of the Tidings of Christmas paper.


Place a $50 or more order on my Online Store and use the Host Code, CZYMRU4T, to receive a beautiful Thank You card and the Creativity Abounds Design Team Hand-Penned Tutorial Bundle as gifts from me.  You're going to love these cards. 


Tuesday, July 6, 2021

Technique Tuesday Blog Hop - Ink (July 2021)


This month we're sharing some interesting ways to use ink.  The last few weeks I've been obsessed  with making different backgrounds for my cards. Hopefully, you'll be willing to put up with some more experimentation as I create new backgrounds for cards.

I've been hearing about all the fun you can have with isopropyl alcohol. No, not for drinking but for making amazing card backgrounds. Today, I'm sharing two different techniques using 91% isopropyl alcohol...

To make this first background,

  • Cut out a 4.0" x 5.25" piece of Vellum paper 
  • Select a few different Stampin' Blends. I used Dark Highland Heather and Dark Polished Pink for this background.
  • Use the brush end of each Stampin' Blend to lay down some ink at various places on the Vellum paper
  • Use a water painter or paint brush to add drops of isopropyl alcohol to the Stampin' Blend ink on the Vellum paper.
  • Watch as the isopropyl alcohol causes the ink to expand and make beautiful designs.
  • Let the ink dry completely.
  • Attach the Vellum paper to a piece of Basic White cardstock using glue or glue dots in each corner.
  • Attach Basic White cardstock to card base and decorate as you wish, 


To make this background, I repeated the same process but I used a few drops of ink from three different reinkers (Bermuda Bay, Melon Mambo, and Daffodil Delight). This technique requires more time for the ink to dry. If you're in a hurry you can use a hair dryer to reduce drying time.

The ink from the reinkers reacted more vigorously spreading the ink across the Vellum paper. I wish I used the same colors on both backgrounds to make the comparison.

I like them both...Which one do you like better? 

Thank you for visiting my blog today - Sea Ranch Creations! Please visit all the other demonstrators blogs to see what techniques inspire you.

Happy Stamping!

Susan


Stampin' Up is currently having a 15% off SALE on selected Designer Series papers. This would be a great time to stock up on some of your favorite papers! I just love the Hand-Penned paper so that will definitely be on my shopping list. I also want to start my Holiday cards so this is the perfect time to buy some of the Tidings of Christmas paper.


Place a $50 or more order on my Online Store and use the Host Code, CZYMRU4T, to receive a beautiful Thank You card and the Creativity Abounds Design Team Hand-Penned Tutorial Bundle as gifts from me.  You're going to love these cards. 


Sunday, July 4, 2021

Happy 4th of July!

I hope you're spending time with family and friends today - enjoying the opportunity to talk, catching up on life events, and sharing a meal together! Wishing you an awesome day!

Before the day ends, please take a moment to remember this day is a symbol of our fight for democracy and our declaration to be a free country. Each of us needs to do our part to make sure we protect our democracy and ensure that everyone can take advantage of the rights provided in the constitution.


May Our Flag Continue to Wave In Peace and Freedom.

Susan


Thursday, July 1, 2021

Need I Say More...


What were the last craft supplies you purchased?  

Stampin' Up is having a 15% off SALE on selected Designer Series Paper starting today (July 2021) while supplies last. Don't miss the opportunity to save some money on some beautiful papers. 

Here are the designer series papers on sale...Which ones do you plan to purchase?


I'm planning to purchase the Beauty of the Earth, Hand-Penned, and Tidings of Christmas papers.

Place a $50 or more order on my Online Store and use the Host Code, CZYMRU4T, to receive a beautiful Thank You card and the Creativity Abounds Design Team Hand-Penned Tutorial Bundle.  You're going to love these cards. 

Happy Stamping!

Susan